UPDATE
Oct 22, 2001 noon, Mountain Daylight time.
I am retired. There are no more adapters. My crimper is worn out and I am not going to replace it.
Here’s my Home page.
E-mail dougm (at) csolutions (dot) net
Die spammers, DIE!!!!!!!
Netscape does not get the links correct. Sorry, but use Microsoft Internet Explorer or change the back slashes to front slashes in the address window in Netscape. The links are correct, but Netscape puts backslashes in for some weird reason.
How to Use Your Dell Case with a
Real Motherboard
This information is not valid for Dell's Pentium 4 systems.
Rewiring your
machine can be dangerous to your or your machine's health. You do so at your
own risk.
This is a
lot of hassle. May I suggest you just
buy a new case.
Here’s a
nice one. You might also look at Antec.
The performance series is way sweet.
EMS computing has really good prices on
cases and has a pretty good rating at Resellerratings.com
(If you just want to put your
Dell in a new case, or upgrade the power supply, click here.)
Your Dell computer uses a proprietary power supply and the connections to the two buttons and LEDs on the front of the case need to be adapted.
UPDATE: Apparently, there is no standard for the front panel connections. I should say that your Dell is less standard than 99.9% of the rest of the world with regard to the front panel connections. The Power supply, however, is proprietary.
This page attempts to give you several ideas for how to adapt your case. The easiest (cheap) way is to buy an ATX and AT power extension and cut and splice the 25 wires. Then either buy or make an adapter for the front panel buttons and LEDs. The adaptations should cost about $25 with shipping. By far the easiest way is to buy a new case. Dell power supplies are excellent quality. You will need to spend upwards of $80 or so to get a case with an equivalent power supply.
I have an unconfirmed report that the SIS 620 motherboard (whatever that is) has the same front panel connections as Dell uses. I also seem to remember Tyan makes some boards with the same connections. I also know that the ECS K7S5A has the same configuration, but there is not enough room between it and the fan header to fit the Dell connector. You would have to cut off some of one end of your Dell connector, but I think it would work. You would then need an AMD-approved power supply.
This is how I wired my Dell case
This information is from a Dell Dimension XPS P166s, ca 1996. It was the very first Pentium available from Dell using SDRAM. I think all other Dells are the same. Dell changed a lot of things with their P4 systems. This site will not help you with Dell P4 cases.
If you want to use your Dell case with a real motherboard, you’ll need to do some re-wiring of the front panel connectors. You’ll also need to replace your power supply (since Dell uses a proprietary power connector), and you’ll need to make openings in the back of the case for 2 com ports and 2 USB ports if your Dell doesn’t have them. My Dell only had 1 com port and no USB ports. I used a Dremel tool with a cutting wheel and made really nice square holes. The panel comes out of the case so you can work on it. HERE’s a picture of an I/O panel I just cut on.
I bought an Antec PP303x 300w power supply for $37 from www.buy.com and installed it in the Dell
case. I chose that particular supply
because of an excellent review on www.anandtech.com
. It’s a good power supply at a great
price, but it is very noisy.
(The power supply is very quiet.
My noisy fan is a Golden Orb CPU cooler that has a bad bearing.) UPDATE, DEC 10, 2001: The Antec PP303x is a fine power supply, but
will not run the latest AMD processors.
For that, you need to go to AMD’s Web site, to their technical info
page, and buy an ATX power supply that is listed there. Enermax makes good power supplies, as does
Enhance, both available at http://www.newegg.com. I guess you could re-wire the power
connector on the Dell supply if you wanted.
Also, just in case you’re wondering, the current motherboard form factor
standard is ATX. My Dell case was a
standard ATX case, and you need to be sure you buy an ATX motherboard and power
supply. Here
is the address for the Dell Power supply pinout from a Dimension XPS B
series computer if you care to re-wire the power supply outputs. You are concerned with P1 and P7. You should be able to find the ATX standard
on the Web here. Should that link go dead, here’s the
diagram some clarification as to how the diagram is oriented.
So now you have a real power supply in your Dell case and you need to hook up the front panel buttons to your new motherboard. I first tried to split apart the ribbon cable at the motherboard end and use it that way, but I couldn’t get the wires split neatly enough to suit me.

Here is my wiring job. I removed the retainer from the top of the connector, pulled out the ribbon cable, punched in those wires you see, and put the retainer back over the wires. If you remove the little board from the plastic mounts, you can turn it over and follow the tracings on the board to the LEDs and the switches. I used an old case as a donor for the wires. About the only other thing I can think of for you to use as wires with ends on them are the CD-ROM to sound card cables.
The magnet donut was on the wires, so I left it. I also had to install the speaker, since my Dell motherboard had a speaker onboard. …but the speaker fit in a slot in the existing Dell plastic thingy.
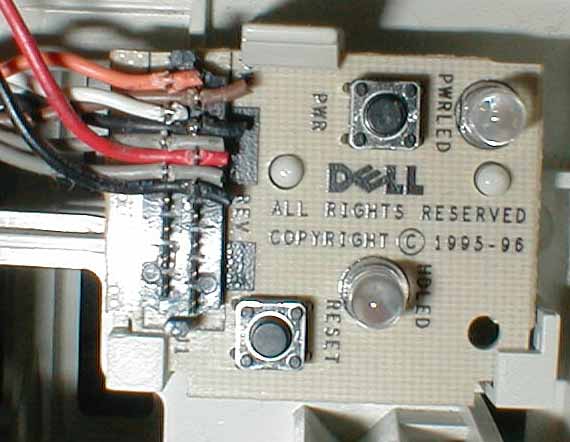
Here is a close up of the connector with the retainer removed. The wiring is from the top:
Orange IDE LED +
Brown pwr LED +
White IDE LED –
Black pwr LED –
Gray reset switch
Red pwr switch
Gray reset switch
Black pwr switch
Now you might want to test your new wiring before you plug it into your new motherboard and fire it up. Hopefully you won’t let the magic smoke out of your motherboard. Here’s a suggestion for testing.
P. S.
Apparently my descriptions aren’t clear enough, so I’ve taken some new pictures to clarify what I’m talking about. I went to both Radio Shacks in town, and neither one stocks the stuff I need. I don’t want to head to town to the big electronics shop, so here’s some clarification as best as I can do without having the parts to take pictures of.
Power connections
I don’t make the adapters for the power supply. The good news is you can make your own for
about $10.00.
I received an E-mail from a very helpful Dell
upgrader regarding the power connections.
At http://www.cablesonline.net/powercables.html there is an ATX power extender for
the lovely price of $3.00, and an AT power extension for $3.00. There is no picture, but this is just what
I’ve been looking for. I might order
one some day and post a pictorial “how to” on making one of these work for your
Dell power supply. In the meantime,
these couple of pictures will have to do.
It can be done without any special tools at all, and I’ll let each
interested Dell upgrader make his/her own, since I’d rather not do it and
wouldn’t like the liability of messing with a power supply. That was also my intention with the front
panel connectors, but there didn’t seem to be a good way to do it, so I decided
to make some.
Here’s a photo of the power supply upgrade sent to
me by a resourceful Dell owner (thanks, Jim).
He bought the ATX power extender and the AT extender. You just need the one connection and the
wires from the AT connector to plug in the extra little Dell (3.3v)
connection. Looking at the photo below,
the right side plugs into the Dell power supply and the left side plugs into
your new motherboard. You basically cut
all the wires in half on the ATX extension and then use half the AT extension
and splice everything back together the right way. Fun huh? You could use
the same power extenders and adapt a Dell motherboard to a standard ATX power
supply. You’d just use the other end of
the AT connector and reverse the ATX plugs.

Here’s his drawing of the splice job. Notice that space 19 is not used on the Dell
connector, but is used on the ATX connector.
This means you can’t simply cut and splice your Dell power plug, since
you’d be short pin 19. You will have to
use the ATX extender to do this modification or buy a terminal and a crimping
tool to get wire 19 into the Dell connector.
The small words you can’t read say “Dell”, “ATX”, and “Aux” (that’s the
little 3.3v connector on the Dell). You can see that circuits 1 and 3 get
spliced together on the Dell end, and then those two wires get spliced into
circuit 4 on the standard ATX plug. If
you look at the diagrams HERE ,
you can see that those are the +5v wires.
I think you should be able to figure out the rest. You can go HERE to
see my diagrams and some photos of the Dell and standard ATX connector.

Once again, I do not make these
power supply adapters. You make your
own or buy a new power supply.
How to get the front panel buttons working.
If you want one of my front panel adapters, sorry, but
they’re sold out. There will be no
more.
I have looked at the support.dell.com site for the
XPS M___s computer. They seem to
have a different arrangement for the pins, with a separate hard drive LED
connection. If you have one of these,
E-mail me and we can decide how to adapt your case. Update: The M___s motherboards are the same. The extra HD LED pins seem to be for SCSI
drives.
Be sure to read this whole page, as there is an idea
for you to make your own for under $5.00. It won’t have the nifty connection for the
Dell ribbon, but it’ll have the small connections to the left.
I used to make these with solid wire, because that’s
what I have and it’s much easier to work with.
That means you need to install them and leave them. With enough back and forth movement of the
wire, the wire could break. They should
be fine for many years of service, though.
If you get a broken wire, E-mail me and I’ll send you a new wire to
stick in your harness. The last several
cases I’ve bought have come with solid wire for the front panel
connections.
Here is a shot of one of my adapters. The plug at the right plugs into the Dell
ribbon conection.
The smaller plugs on the left plug into your new,
standard, ATX motherboard.
NO SOLDERING REQUIRED!
If you’re going for the soldering iron, you’re doing
something wrong. One of my customers
got out the soldering iron and ended up buying a new case.

Here is
a list of machines folks have installed these adapters on.