LAST UPDATED 11/13/05
| FIRST, A BIT OF BACKGROUND... |
To grasp my "hardware strategy" (how's that for an unnecessarily grandiose term?), you need to understand my two prime motivators in setting up my home systems:
- I want reasonably fast machines, but do not require "state of the art" equipment. At least, not most of it!
- Basically, I'm cheap. Fortunately, this dovetails fairly well with #1, preceding...
I currently run a total of five (5) machines on my home network. Only two are "commercial" units, both of them Dell's--an Inspiron 600M notebook and a vintage 1998 Dimension XPS-R400 that is now my webserver, sending this very page to you. The other three are all "home-builts" constructed by yours truly. Building your own PC's allows a degree of control and flexibility in specifying the various components that I've really grown to prefer. It's also a good learning experience--particularly if you've never done it before--and very enjoyable. Hitting that power button and having a PC that you built yourself boot up the first time is a very gratifying experience. (We won't talk about the feeling of hitting the button and having nothing happen!) Here's the lowdown on these five systems:
| SOMETHING OLD.... |
As mentioned above, one of these machines is quite old by PC standards. My Dell Dimension XPS-R400 was purchased in mid-1998, and originally came with a 400MHz Pentium II processor. This PC is built upon Dell's version of the Intel SE440BX motherboard, which is the key to its unusual longevity. That's because the the BX chipset technology turned out to be so robust and upgradeable. These motherboards were originally developed to mate with the Intel "Deschutes" Pentium II processors, and later extended to run the "Katmai" Pentium III's. But most BX boards (with some BIOS revisions) also turned out to be compatible with the 100MHz FSB "Coppermine" Pentium III CPU's, extending their useful lifetime very significantly. At one time or another, I had Coppermine P3's running in this and several other BX-based PC's, though they were eventually replaced with what you'll read about next....
In late 2001, a new upgrade option appeared for the BX system owner in the form of the PowerLeap PL-iP3/T adapter technology. This socket-to-slot adapter allows the use of Tualatin Celeron processors (all of which are 100MHz FSB) on many BX motherboards, a feat that would not otherwise be possible. PowerLeap's website has a list of motherboards that are compatible with the adapter. Though not quite as straightforward as upgrading with a Coppermine P3, this technology works for the majority of compatible BX system owners, and PowerLeap has been very supportive of users who have run into trouble with the upgrade. Their initial offering coupled the adapter with a 1.2GHz Tualatin Celeron CPU, but 1.3 and 1.4GHz versions appeared later. The 1.4GHz Tualatin Celeron stands as the fastest 100MHz FSB processor upgrade available for these older BX machines. Hey, not too bad for 1998 motherboard technology!!
I have a 1.4GHz Tualatin Celeron CPU and PowerLeap iP3/T adapter running in the old XPS-R these days, and it does a great job as my website server. This processor rig is one of several evaluation samples that I obtained from PowerLeap. I should emphasize that, while I paid no money for them, they were by no means "freebies"! The time and effort that goes into running a comprehensive set of benchmark tests and then preparing (hopefully!) professional looking webpages to display the results is considerable! And PowerLeap provided these samples with the understanding that the test results and my subsequent recommendations--good or bad--would be posted on this website for all to see. So stop over at my PL-iP3T REVIEW PAGE and check it out!
| ....SOMETHING NEW(er) |
The other four PC's in the house are much newer. One is a Dell Inspiron 600M notebook that I'll provide some details on later. The remaining three are all homebuilts constructed with the combination of AMD Athlon processors and motherboards based upon one of the Nvidia "nForce" chipsets. Two of the three use Athlon XP "Barton" CPU's paired with nForce2 motherboards. Having built and operated several of these systems now, it's easy to understand why this processor/chipset combo is so popular among home PC builders & overclockers. The combination of the eminently overclockable Barton-core Athlon XP's and the flexible and high performing nForce2 motherboards makes for a very fast machine at an extremely reasonable price point. The total price for all the parts needed to make the basic "box"--CPU, motherboard, memory, case and power supply--can be as low as $300. In fact, unless you go absolutely nuts with tons of high-end DDR-RAM, it's tough to go over $500, even with premium components.
Two features really stand out to me in making the nForce2 motherboards the "mobo-of-choice" for Athlon XP systems:
- Auto-unlocking of the processor clock multiplier for overclocking flexibility for Athlon XP processors made before October '03. At that time, AMD instituted the use of a "hard lock" on the Athlon clock multiplier, and these motherboards can't overcome that. (But the Mobile Athlons still use unlockable multipliers!)
- A dual-channel DDR memory bus, which allows memory bandwidths as high as 6.4GB/sec with dual DDR400 memory modules.
The third of my Athlon systems is currently the "big dog" in the house--an Athlon 64 3200+ "Venice" processor mated to a Socket 939 nForce3 Ultra mobo. The Athlon 64 has been around for a while now, and it was time for Duh Voodoo Man to try one out. Possessing a performance premium of about 15 - 20% over an equivalently clocked Athlon XP, the A64 processors control memory onboard, rather than delegating this task the the motherboard's northbridge chip. This translates to substantially faster memory subsystem performance. Also, the Venice core uses the newer 90nm fab technology vs. the older 130nm Newcastle core, resulting in reduced power consumption and lower operating temperatures. This also tends to make the Venice A64's good overclockers. =^)
So with that as a background, here's the rundown on my current hardware:
| MACHINE #1: HOMEBUILT MSI K8N NEO2 PLATINUM nFORCE3 ULTRA & ATHLON 64 3200+ WINCHESTER |
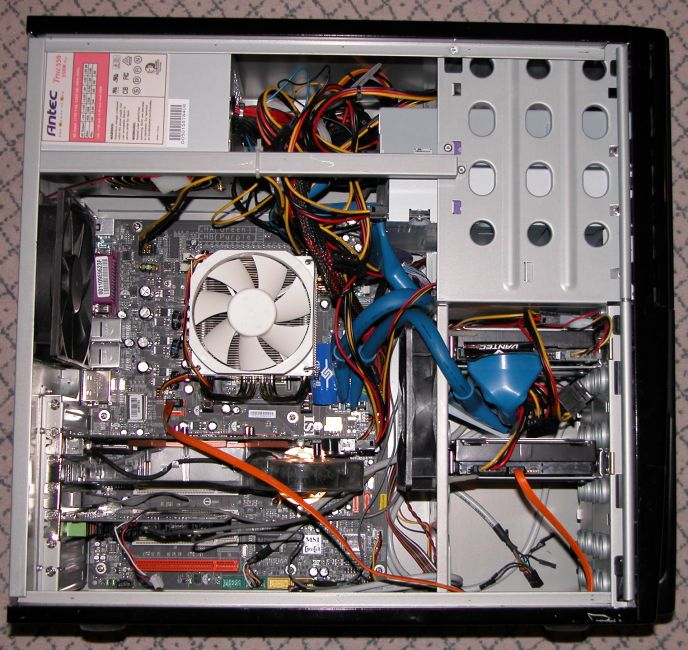
This is the second newest PC in the house, built by yours truly in April 2005, and is my personal machine. Actually, the term "built" isn't strictly applicable here, since what I really did was to remove the motherboard, CPU, memory and cooler from my previous Mobile Athlon XP system and install an Athlon 64 3200+ processor and Socket 939 nForce3 Ultra motherboard combo, as mentioned above. My initial choice for a processor was the "Winchester" 3200+ chip, also a 90nm processor, but a few months older technology than the Venice core processors, which hadn't yet hit the market when I did the initial system upgrade. After reading up on the various nForce3 mobos available, I settled on the MSI K8N Neo2 Platinum for this upgrade, based upon a number of excellent reviews and its reputation for overclocking very well. This full-featured board offers many extras, including onboard firewire, four SATA ports, and dual-channel Gigabit ethernet. I stuck with an AGP nForce3 board, rather than going with the newer nForce4 with PCI Express, due to the fact that I have an AGP Geforce 6800 GT that's only a few months old and needs to last me for a while, assuming that I wish to stay out of divorce court, which I do.
To take advantage of the vaunted memory subsystem performance of this CPU/motherboard combo, I needed to find some high quality DDR RAM that would handle high speeds (at least 250 MHZ was my target) without breaking the bank. Though there was plenty of super-premium memory available in the $300-and-up range for a matched pair of 512MB modules, this was more than I wanted to pay. After some research, I settled on OCZ PC3700 Gold Edition Rev.3 as an excellent compromise between performance and price. Though nominally rated as PC3700 (233MHz), THIS REVIEW at AnandTech showed this RAM to be an extremely fast performer and easily exceed 250MHz capability, topping out around 270MHz. Priced at a very reasonable $230 at the time, it filled the bill for me nicely.
Because the PC in its previous configuration already had a nicely functioning installation of XP Pro plus applications & games out the wazoo, I really wanted to avoid the hassle of a "clean install" of the operating system. However, just powering down, swapping the motherboard, CPU and memory, and then powering back up is a recipe for disaster with Windows, especially XP. To get around this, I ran a "repair" installation of XP Pro instead. In a nutshell, what this does is to reinstall all of the core operating system files and then force the re-enumeration of all the system hardware. However, it keeps all of the rest of your OS configuration and settings, including leaving previously installed applications in place and (with an occasional exception) functioning. This saves a huge amount of time vs. a clean install of XP. Windows does need to be reactivated when you're done with the XP repair install, though. In case you ever want to do something like this, there are many "how-to" articles available on the web that give detailed step-by-step directions for the process. One of the best can be found HERE at the homepage of Jim Foley, a.k.a. the Elder Geek, a fantastic website that any self-respecting PC enthusiast should have bookmarked.
One element of doing an XP repair installation that is less than convenient is the fact that you will lose the Windows updates that you've done since your last installation, including any Service Packs you've installed. If you've run the SP2 installation on an XP machine lately, you know that this is not exactly a two-minute undertaking. In my case, I have a copy of the original XP Pro, and really wanted to avoid having to do an SP2 reinstallation after the XP repair was completed. But it turns out that there's an excellent way to get around that, and the Elder Geek has that one covered, too. You can create a new bootable XP installation CD with Service Pack 2 already fully integrated onto the disk by using a process known as "slipstreaming", as long as you have a CD burner and software. The entire process is described in detail in THIS ARTICLE on the Elder Geek website. I followed these instructions carefully and successfully made a new XP Pro CD with SP2 included, which I then used for the XP repair install. Worked like a charm, and all I had left to do was to run the XP updates that Microsoft has issued since SP2 came out. After reinstalling a few device drivers and reloading a couple of applications that weren't working properly after the repair, my PC was humming along with the new hardware.
With everything functioning properly, the next step was to crank up the system clockspeeds and maximize performance. I won't get into a full-blown explanation of that process, since there are numerous sources on the web that cover this topic for Athlon 64 systems. Basically, you have three main parameters to play with--CPU speed, memory speed, and hyper-transport tunnel (HTT) speed. This latter is conceptually similar to the FSB in older systems, though it differs in several ways. The bottom line is that you determine the maximum speed that each is capable of running at with good stability, and then set up the system with the best attainable combination of the three. In my case, the best combo I could attain was with the HTT at 261MHz, the memory set to run synchronously at that speed, and the CPU clock multiplier at 9, giving a processor clockspeed of 2350MHz. While I'd hoped to get a 3200+ Winchester chip that would do 2500MHz, these appear to have become much less common since December 2004. The early Winchester processors seemed to routinely make 2500MHz, with many instances of stable operation in the 2600 - 2700MHz range reported. I suspect that AMD went to "binning" the better performing chips for sale as the higher-priced 3500+, and the less capable ones get designated as the 3000+ or 3200+ versions. Nonetheless, 2350MHz represented about an 18% overclock for the chip and translated to a calculated "P-rating" of above 3700+, which certainly wasn't shabby! Still....
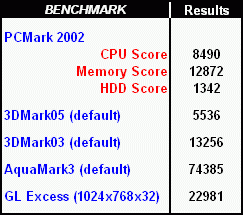
Within a month of completing this upgrade, the newer "Venice" core Athlon 64's started hitting the shelves. Though based upon the same 90nm fab process as the Winchester, the Venice chips offered a couple of enhancements, and also quickly established a reputation for being terrific overclockers. Whether I was motivated by scientific curiosity or a pathetic inability to resist upgrade temptation is open to debate, but I went ahead and bought a 3200+ Venice chip and replaced the barely-two-months-old Winchester. You can see the outcome of this purchase and a head-to-head comparison of the Winchester and Venice 3200+ processors at THIS LINK. In any case, I found the Venice chip's overclocking rep to be well founded, with the new processor reaching 2600MHz, a healthy 30% overclock. This is the same clockspeed as AMD's top-of-the-line FX-55 processor, and equivalent to an Athlon rating of 4100+! Benchmark data is shown below.
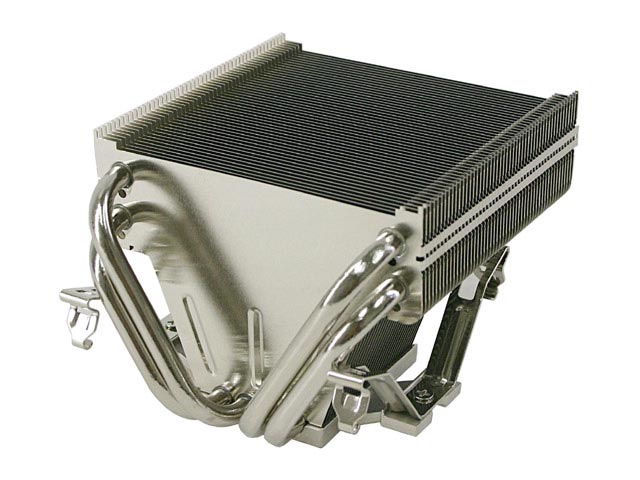
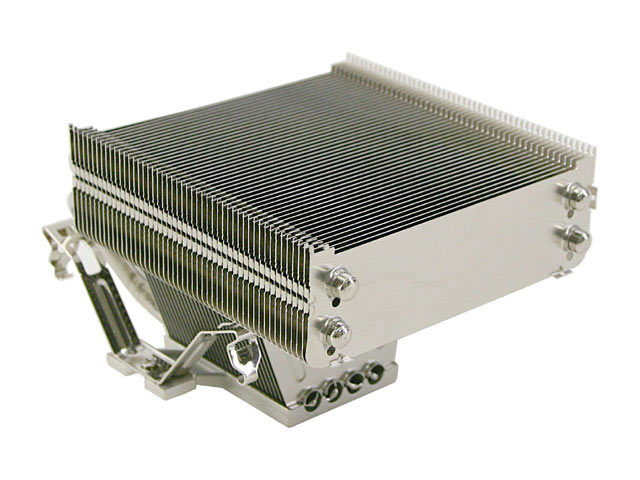
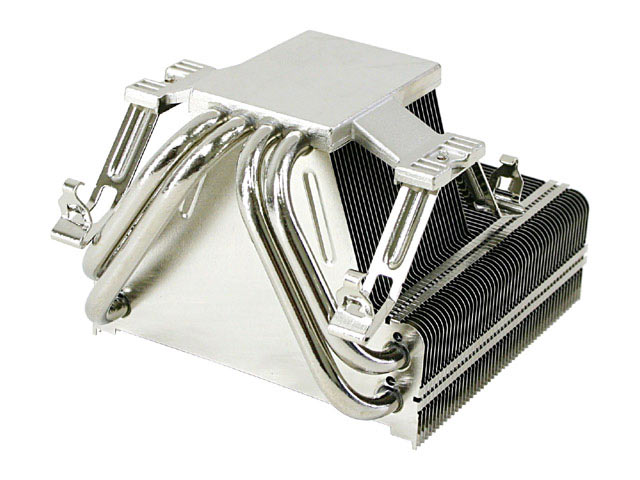
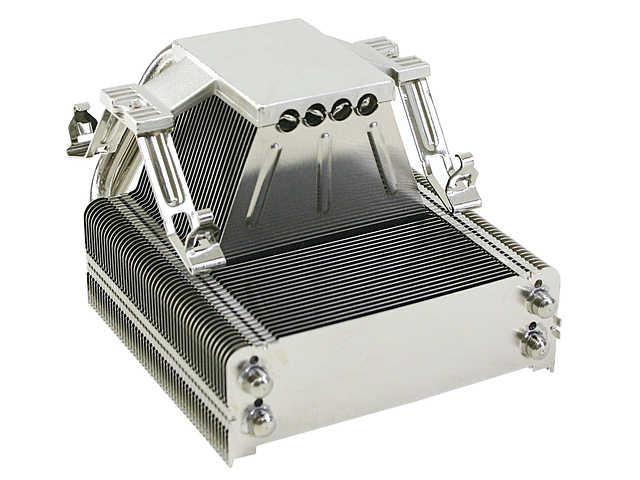
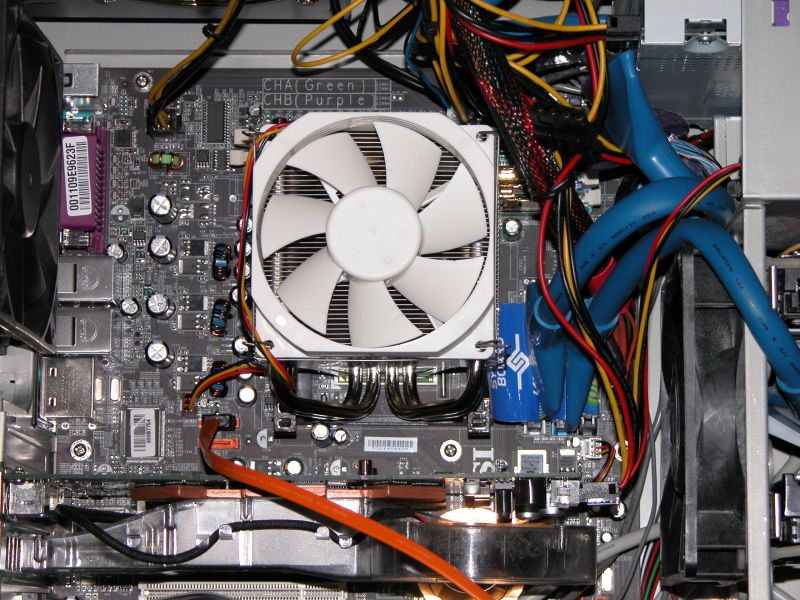
Cooling for this overclocked processor is provided by the very impressive Thermalright XP-90 cooler, fitted with a whisper-quiet Thermaltake Silent Cat 9 fan. The XP-90 integrates four "heatpipes" into what otherwise looks like a pretty standard, albeit very LARGE, cooler design. But it's these heatpipes that make all the difference. These sealed tubes are filled with a low boiling point fluid (freon of some type?) that is vaporized by the heat of the processor coming through the contact plate at the bottom of the cooler. The vapor rises through the tubes into the finned cooling section, where the airflow provided by the fan helps cool and recondense it to liquid, which flows back down to the base. This is the same principle of operation as an air conditioner, and it is very efficient in removing heat. I've noticed that when I terminate a Prime95 CPU stress test, the processor temperature will drop 10 - 15 degrees C in a matter of a few seconds! Here are a few photos of the XP-90, courtesy of NewEgg.com:
Thermalright XP-90 Photos (Click on individual photos to see larger version)
|
This PC is my current "main" machine, the one that I use for my general computing needs. Of the variety of tasks for which it is used, by far the most demanding is 3D gaming. It's probably symptomatic of a latent sociopath, but Duh Voodoo Man is a long-time fan of first-person shooters. I got started with id's original Doom, and haven't stopped yet. I play strictly against the computer, i.e. "single player" mode. This is because I suspect that if I ever got started with online deathmatching, the wife and kids would never see me! People who know me say that wouldn't necessarily be a bad thing, but what do they know??
The combination of the overclocked Athlon 64 Venice processor and an Albatron Trinity Geforce 6800 GT video card makes for an extremely capable 3D gaming platform. This card doesn't even flinch running Doom3 at 1024x768 with most quality settings at "High" and 4xAA/8xAF. If you'd like to read more about my experience with this card, plus a few benchmark results, take a look HERE.
Here are the current configuration specs on this PC, some popular benchmark results (AA & AF turned off for the video tests), and a few photos:
 |
 |
|


One down and four more to go....
