
| Wiring Mods: The Basic Configurations |
So let's take a look at some of the basic "building blocks" of these humbucker modifications--the wiring for the various options mentioned on the previous page. But before we start....
TWO IMPORTANT NOTES:
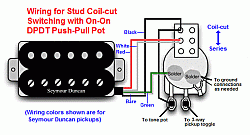
- Throughout the following diagrams, the pickup wire colors used are those for Seymour Duncan 4-conductor humbuckers. Be forewarned--other pickup manufacturers use DIFFERENT colors! Be sure you carefully check the color scheme used for YOUR particular brand of pickups. If you don't, chances are that you'll end up with a very odd sounding--or silent--guitar!! There's a good webpage with a detailed description of the pickup color schemes used by most of the better known pickup makers HERE.
- The orientation of the 6-contact DPDT switch blocks in the following diagrams is NOT meant to represent the "physical reality". These diagrams are laid out for readability and to represent the electrical connections correctly. They are not intended as a depiction of actual physical orientation. You need to be familiar with how your DPDT push-pull switches work--which contacts are connected in the "up" and "down" positions--and wire them accordingly!!
 |
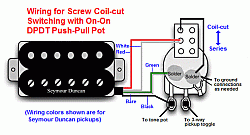 |
Basic Coil-cut Wiring - Coil-cut switch wiring is probably the simplest humbucker wiring modification, and the most popular. It can be done two different ways, to cut out either the stud coil or the screw coil (the one with the slotted screw tops; also called the adjustable coil). At right are diagrams for both wiring variations. For both versions, it starts with wiring the two series link conductors (white and red, for Seymour Duncan) to one of the middle connectors of the P/P. For the stud coil-cut, the connector above it is then wired to the "hot" signal from the pickup (black wire, for Duncan) and to the volume pot, so that when the switch is pulled up (as indicated in the diagram), the stud coil is shorted out. In the down position, the pickup coils remain in their stock series configuration. For the screw coil-cut, instead of using the "hot" wire, the adjacent connector is instead wired to ground (the pot body, in this case), which shorts the screw coil when the switch is activated.
Note that this wiring mod can NOT be done with a single-conductor/braided shield humbucker. As previously mentioned, this is one of the most common and popular of humbucker wiring mods, and its simplicity is undoubtedly a factor.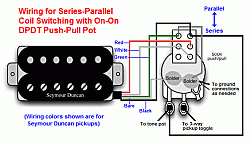 |
Basic Series/Parallel Wiring - The diagram at right shows the wiring for a DPDT P/P that switches between a series and parallel orientation of the two coils. It is significantly more complicated that the coil-cut, using five of the switch's six contacts. When in the up position as indicated in the diagram, the two coils will be connected in parallel. The down position leaves the coils in the stock series configuration.
Functionally, the parallel setting differs only slightly from coil-cut, being a bit less "twangy". Output volume is also slightly lower. The advantage of parallel mode over coil-cut is that hum-cancellation is maintained, since both coils are still active and oriented the same as in the stock series configuration. So if your guitar tends to be "noisy", using this mod vs. the coil-cut may be the better way to go.
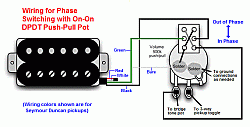 |
Basic Phase-Change Wiring - This diagram shows how to wire a DPDT P/P so that it reverses the phase of the humbucker that it's wired to. Note the characteristic "X" wiring between the corner contacts of the DPDT switch, which serves the function of switching the hot signal to the ground wire and visa-versa. When in the up position as indicated in the diagram, the black wire (normally the "hot signal") will become the ground, and the green wire becomes the "hot". This renders the humbucker out-of-phase electrically with the other humbucker. The down position of the switch leaves humbucker in its normal "in phase" condition with respect to the second 'bucker.
Just a bit of guitar lore here: Peter Green, legendary founder and original guitarist for Fleetwood Mac, owned a '59 Les Paul that had its two humbuckers out of phase, giving him a characteristic tone. The interesting thing is that this had nothing to do with the guitar's wiring, and it wasn't even intentional! Green apparently disassembled one of his humbuckers and accidentally put it back together backwards, rendering it out of phase with the second 'bucker. He liked its hollow, haunting tone so much, he left it that way.
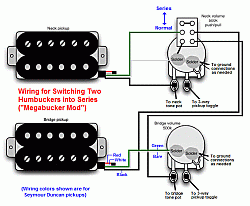 |
"Megabucker" Series Wiring - This wiring modification differs fundamentally from the preceding ones, since it requires wiring two humbuckers to the same DPDT P/P switch. In a "stock" dual-humbucker guitar, the middle position of the 3-way pickup selector toggle switch puts the two 'buckers in parallel. This wiring mod causes the two to be in series when the switch is activated, resulting in a noticeably fatter, more powerful tone. Essentially, what it does is to route the signal of one humbucker through the second one, rather than to the volume pot or 3-way switch, as it would normally be routed.
While the wiring can be done two different ways (basically just changing which of the two pickups is "first" in the series chain), this makes no difference in the resulting tone. It does have a direct bearing on how the controls work, however. Since the "hot signal" from the first humbucker in the series chain no longer goes through its own volume and tone pots, these controls are "dead" when the series switch is activated. Volume and tone are adjusted through the controls of the second humbucker in the series chain (the neck pickup, in the diagram shown at right). Additionally, the 3-way toggle position for the first humbucker in the series chain will be dead, as well. For the example shown, selecting the bridge or "Treble" position of the 3-way results in no output signal. Makes a good "standby" switch for your guitar!
Certainly, there are many more wiring modifications that can be done, including the use of multi-position toggles, radial switches, "blend" pots, and more. I won't get into those here, but there's an internet full of information out there where you can find all these and more. But we're not quite through here yet....
| Wiring Mods: Gettin' Fancy.... |
In my opinion, the really cool stuff comes from combining two or more of the above mods together on a single guitar. As you'll note, all of the "basic" mods shown above only use a single push-pull pot. But dual-humbucker guitars pretty much always have at least two pots (master volume and master tone), and many have four (volume and tone for each humbucker). I own two dual-humbucker guitars, an Epiphone Elitist Les Paul Standard and an Epiphone Dot (335-type semi-hollowbody), and both have four pots. I've rewired both using multiple mods, and got several new and useful tones for both guitars. So let's look at a couple of these "combo mods":
MODS FOR DUAL 4-CONDUCTOR HUMBUCKERS & 4 POTS:
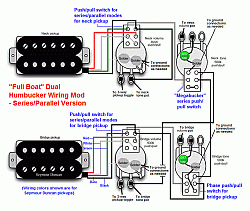 |  |
"Full Boat" Wiring Mod, Series/Parallel Version (near right) - I refer to the following two wiring mods as "Full Boat" versions because they both convert all four of the available pots to push-pull switches. This version uses P/P's wired for series/parallel switching on both volume pots, along with a phase switch on the bridge tone pot and a "megabucker" series switch on the neck tone pot. The result is a very flexible arrangement offering a total of 20 different pickup configuration combinations, though only about 14 of those are tonally different enough to be truly useful. Beats the heck out of the three stock choices for a dual-humbucker guitar, though! This is how I have my Epi Dot wired, and I really love it.
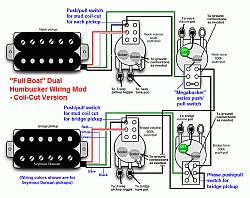
"Full Boat" Wiring Mod, Coil-Cut Version (far right) - Essentially the same as the preceding mod, but substituting stud coil-cut switching on both humbuckers for the series/parallel mode. The coil-cut gives a slightly sharper, more trebly tone than parallel, but at the expense of loss of hum cancelling. Still, many people prefer this set-up. This particular wiring mod is also known as the "Jimmy Page" mod, since the legendary Led Zeppelin guitarist used a very similar set-up in some of his Les Paul's.
One aside here--I really don't see much point in combining coil-cutting and parallel switching for the same humbucker in a combination wiring mod. I learned this from experience, since I initially wired my Dot with a 3-way toggle for series, coil-cut and parallel modes. The bottom line is that the coil-cut and parallel modes don't sound different enough, in my opinion, to want to have both on the same guitar. If you want maximum twang, the coil-cut has a bit more of that. If it's more important to you to maintain your 'bucker's hum-cancelling capability, stick with parallel wiring.
MODS FOR ONE 4-CONDUCTOR + ONE SINGLE CONDUCTOR & 3 POTS:
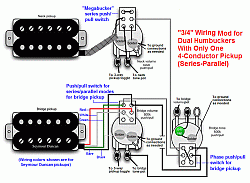 | 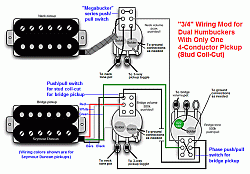 |
"3/4" Wiring Mod, Series/Parallel Version (near right) - The combination of one 4-conductor humbucker with one that's single conductor/braided shield is fairly common in dual-humbucker guitars. As a matter of fact, my Epi Les Paul is set up like this, with a Duncan Pearly Gates (4-conductor) at the bridge and a Duncan '59 (single conductor) at the neck. This eliminates the option of coil-cut or parallel switching for the single conductor pickup, which is one-fourth of the "Full Boat" wiring mod above. That leaves the other three-quarters of that mod still doable, hence the term "3/4" mod. Here, the bridge volume pot has a serial/parallel switch, the bridge tone pot handles the phase switching, and the "megabucker" series switching is moved over to the neck volume pot, which makes the wiring for the neck humbucker a bit easier. This mod gives a total of 11 different pickup configuration combinations, of which all but a couple are useful.
"3/4" Wiring Mod, Coil-Cut Version (far right) - Same as the preceding, but with the bridge humbucker wired for stud coil-cut. This is how I decided to wire up my Les Paul, and it works great. The controls cavity on the guitar is very well shielded, so the loss of hum-cancellation in coil-cut mode doesn't add any significant hum.
MODS FOR DUAL 4-CONDUCTOR HUMBUCKERS & 2 POTS:
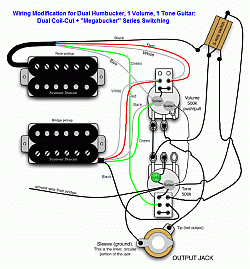 |  |
Dual Coil-Cut + Megabucker Version (near right) - Lastly, I've included two different variations on a wiring mod for another dual-humbucker guitar configuration, namely one that only has two control pots. This is quite a common arrangement, and reduces the modification options significantly, unless you're willing to start adding new toggles, slider switches, etc. Unfortunately, these change the guitar's appearance and maybe reduce its resale value, especially if you start cutting new holes.
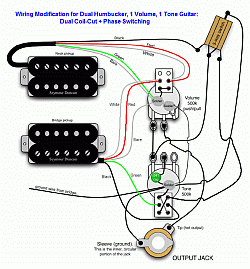
If both humbuckers are the 4-conductor type, you can wire both for coil-cut switching using a single DPDT push-pull. This is very helpful, since you only have two to work with! For this reason, I strongly recommend going with coil-cut vs. parallel switching, since the latter would require using both push-pulls to be able to wire both humbuckers. The second P/P is then available for an additional mod, and is used for the "megabucker" series version in the diagram at near right. The only "disadvantage" to this set-up is that you can't independently coil-cut one humbucker and leave the other one in dual-coil mode, while playing from both simultaneously. Big deal! Personally, I'd want both or neither, anyway.
Dual Coil-Cut + Phase Switch Version (far right) - This second version just substitutes a phase change switch for the "megabucker" series switch. Though I haven't shown it, a third variation on this theme would be to combine the phase-change and megabucker switches and forego the coil-cutting. Personally, that seems to me to be the least desirable of the three options, though opinions will undoubtedly differ!
| Links, References & Final Thoughts |
If you've read (and stayed awake!) this far, then I hope you've found some useful information here. This is by no means a comprehensive treatise on humbucker pickup rewiring, but covers several of the "basics" and their use in combination. But if you're looking for more, let me assure you that it's out there on the web somewhere. Google is your friend, so start searching if you need something more than what's covered here. To help, below are several web links with information that I've found useful.
First, a bunch related to guitar wiring--general info, how-to's, guitar and pickup manufacturers' schematics, etc.:
Wiring & Shielding at GuitarNuts.com
Stewart-MacDonald "Wiring 101" Page
Here are some helpful sites for learning how to solder properly, or for improving your current soldering skills:
EPE Magazine Basic Soldering Guide
Some good sources for guitar parts & electronics, including push-pull pots:
Good luck with your humbucker mods, and don't forget to stop soldering and PLAY that guitar occasionally, 'cuz that's really what it's for!!
ACKNOWLEDGEMENT: Thanks to the folks at Seymour Duncan for those snazzy wiring schematics! I shamelessly copied & edited their diagrams to make the ones shown on this page. And, by the way, they make some great pickups, too! I have four of their humbuckers!
Bob Matthews, a.k.a. "Duh Voodoo Man"
Last Updated October 19, 2006
Questions or comments? E-mail me at THIS LINK
And please visit Duh Voodoo Man's HOME PAGE!