 |
| Why Fool Around with Your Humbucker Pickups?? |
Maybe you have a nice shiny, new Les Paul with a spiffy set of Seymour Duncan or DiMarzio pickups that you wired in yourself, or had installed at your favorite guitar shop. Man, that sucker WAILS now! So why on earth would you want to fool around making changes??
Well, there are several potential answers to that question, but for me, it comes down to the ongoing search for cool and useful tones. The fact is that most 2-humbucker guitars with stock wiring give you just three pickup configuration choices--the bridge pickup alone, the neck pickup alone, and both together (wired in parallel, and in phase). Granted, between those three choices and your amp's settings, use of effect pedals, the guitar's volume and tone controls, etc., the possibilities are nearly endless. And for many guitarists, that's plenty--and there's nothing wrong with that!
But what if, with a couple of hours of soldering and $30 or $40 worth of parts, you could go from those three choices to 10? Or 20? Would that interest you? If so, read on....
| A Little Background on Humbuckers.... |
If you're reading this, you're probably already very familiar with the operating principles of the humbucking pickup and have at least a basic idea of their physical construction. In a nutshell, humbuckers contain two magnetic coils of opposite polar orientation, wired together in series. This arrangement has a couple of notable consequences. First, the opposite polarity of the two coils is what gives them their hum-cancelling property, that is they don't generate the 60Hz background hum that is characteristic of single-pole pickups, hence the term "humbucking". This nifty design was invented by Seth Lover at Gibson in 1955, and the guitar world hasn't been remotely the same since!
The second consequence of this dual-coil arrangement is heard in the tonal characteristics of humbuckers. They have a bigger, richer, fuller sound than single-pole pickups due to their much higher output; you'll often read descriptors such as "warm" or "fat" for their sound. This high output also makes it easier for a humbucker guitar to "overdrive" an amp and give the distorted tones typical of hard rock, heavy metal, etc. But these characteristics are not achieved without some accompanying "give-aways"--humbuckers don't have the clarity, bell-like tone (a.k.a. "chiminess") or top-end articulation that good single-poles do. Like most things in life, there's no free lunch--the design has its advantages and its disadvantages. To keep humbucker-equipped guitars from sounding too dull or "muddy", the controls typically use components (potentiometers, or "pots", and tone capacitors) that maintain as much of their higher frequencies as possible.
Each of the two coils in a humbucker consists of a magnet wrapped with thousands of turns of a very fine strand of wire. The pickup acts as an electromagnet in reverse. Instead of having an applied current flow in the wire induce a magnetic field, as occurs in an electromagnet, a small voltage is generated in the wire when a metal guitar string vibrates within the existing magnetic field. It is this small voltage that is then amplified to the ear-splitting levels we all know and love!
Consequently, each coil has a "start" end of its wiring, and a "finish" end, and a complete humbucker will have four such wire ends--four "conductors", if you will. For many humbuckers--including the vast majority of those that come in guitars in their "stock", as-sold configuration--the "finish" end of one coil is directly connected to that of the second, placing the two coils in series, electrically. One of the remaining two conductors serves as the "hot" signal that will be amplified and the other as the ground connection. Such humbuckers will generally have a single insulated wire within a braided wire sheath that is used to connect them to the guitar's controls. The insulated center wire is the "hot" connection, while the sheath serves as both a shield against electromagnetic noise and as the ground connection. This configuration is commonly referred to as "single-conductor", even though the braided shield itself serves as the second conductor.
However, some stock humbuckers and a large percentage of "aftermarket" ones, such as those sold by Seymour Duncan, DiMarzio, and many more, have all four of the conductor wires emanating from them, usually within a shielded cable. This is an important distinction, because the availability of all four conductors allows some different wiring configurations to be made with the guitar's controls. Several of the wiring modifications we'll examine here require 4-conductor humbuckers to be able to do them.
| So What Are the Options? |
As mentioned above, most stock dual-humbucker guitars are wired as follows:
- The two coils within each humbucker are wired together in series.
- The two humbuckers, when played together (typically by using the middle position of a 3-way pickup selector toggle switch), are connected in parallel.
- Additionally, the two humbuckers are electrically "in phase", causing their respective signals to be additive, when combined.
However, there are other ways that these pickups could be configured:
Only one coil in a humbucker connected - It's possible for a humbucker to run with just one of its two coils connected. This effectively changes the pickup to a single-pole type. As with the parallel coil configuration mentioned above, this gives rise to a brighter and thinner tone, with less volume. The key distinction is that the pickup will no longer be hum-cancelling when wired in this way. This mode of operation is commonly called "coil-tapping" or "coil-cutting", though the latter is the more accurate term, and is one of the most common and popular humbucker wirings mods.
Coils within a humbucker wired in parallel - Instead of the two coils within a humbucker being wired together head-to-tail in a series configuration, they can be wired in parallel. Done correctly, they will still be hum-cancelling, but take on a different tonal quality. The sound will be brighter and a bit thinner, and the volume output goes down.
Two humbuckers wired "out of phase" with each other - Pickups are generally wired to be in phase, in which case their two signals are essentially additive. But they can also be wired out of phase, which causes them to partially cancel each other out. In fact, if both signals were identical and 180 degrees out of phase, the result would be no signal at all. However, the signals from the neck and bridge humbuckers differ significantly, so an out of phase relationship between the two still generates a very useable combined output, albeit with a very different sound than the in-phase mode. The tone takes on a thinner, hollow, almost nasal quality that can be quite interesting and useful, particularly in combination with distortion.
Two humbuckers wired together in series - It's possible to "daisy-chain" two humbuckers together in series, akin to turning them into a single large, 4-coil "megabucker". If joining two coils together in series creates the characteristic humbucker warm, fat tone, then you can imagine what four coils in series will sound like--bigger, warmer, fatter, louder, but at a cost of more muddiness and loss of clarity. But if B-I-G is what you're going for, this is a good way to get there!
The two coils within a humbucker wired "out of phase" with each other - Here, the out of phase condition has a much more dramatic effect, since the signals of the two adjacent coils in a humbucker are extremely similar, so the cancellation effect is very large. The resulting tone is very thin and weak relative to the normal in-phase tone, to the point of being of questionable usefulness to most players.
....and several more - There are several other modifications that could be made, as well. Obviously, you can get into various multiple combinations of the above, something that is quite commonly done, and which I'll have more to say about. Others--for example, wiring one coil of one humbucker to a second coil in a different humbucker to create a "virtual" third humbucker--are possible, but beyond the scope of what I'll cover here.
 |
Now, obviously it's possible to hard-wire a dual humbucker guitar in one of the above ways, but almost nobody does that. Instead, these modifications are almost always achieved through the use of switches, allowing the user to switch back and forth between the original and modified configurations. Probably most useful is a device known as a "push-pull pot", which is a combination of a switch and a control potentiometer combined into a single device. The switch is activated by pulling up or pushing down on the center shaft of the pot. Different types of switches are available in these devices, but the most common and useful is an "on/on double-pole, double-throw" switch. These are two-position switches (up or down) with two rows of 3 contacts each (see diagram at right). When the switch is pulled up, the two center contacts will be connected to the contacts above them; when down, they will be connected to the contacts below. In either position, the switch activates a connection (two, actually!), hence the term "on/on".
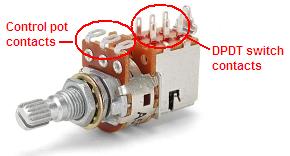 |
At left is a photo of a typical DPDT (double-pole, double-throw) push-pull pot, courtesy of the Stewart-MacDonald website. The double row of contacts for the DPDT switch are labeled. Also indicated are the three larger contacts for the potentiometer portion of the device, which function independently from the switch itself.
Because of the double row of three contacts each, these switches are very flexible and can be wired in a large variety of ways. They can be used for all of the wiring modifications listed above. And they also possess an additional, highly desirable feature--because they replace an existing control pot and use its mounting hole, their use does not alter the appearance of the guitar. This is extremely important to many guitarists, since a lot of us are loathe to start drilling new holes through the tops of our beloved axes!
These push-pull pots--or P/P's, as I'll call them for short--are readily available through any of the good guitar parts suppliers, like Stewart-MacDonald or AllParts. Most humbucker guitars will use 500K resistance pots. Depending upon the thickness of the top of your guitar, you may need either a standard 3/8" or long shaft 3/4" length version. You really have to loosen one of your existing control pots and take a look at it to see which you need.
Another consideration is the taper of the pot resistor control, which refers to how the volume or tone of the pickup changes as the pot shaft is turned through its complete operating range. A "linear taper" pot behaves just as the name implies--if you turn to the halfway point of its total travel, the pot's resistance will be at half of the total rating. However, since the human ear does not respond to sound linearly, a second type of pot has been developed to operate more closely to how the ear hears. This is called an "audio taper" pot, and has become the more commonly used type used in guitar controls. Some guitars use only audio taper pots, while others mix the two. You can generally tell which kind you have by looking for a number stenciled on the side of the pot's body. For example, a 500K audio taper pot will generally be labeled "A500K". The corresponding linear taper pot will be labeled "B500K" (why "B" rather than "L", I have no idea). Personally, I always use audio taper pots, and they've worked fine for me in every case. Here in the US, these push-pull pots currently go for about $9 apiece, give or take.
All of the wiring mods I'll discuss from this point on use these push-pull pots to effect the necessary switching. Certainly, there are other switching devices that could be used, such as toggles, slider switches, etc. However, due to its "non-invasive" nature, the P/P has become the favored switch of mod-happy guitarists, so I'll stick with them for these examples.
So let's get into the specifics of doing some of these modifications....
